

Three Stage Leveling Process
Bradbury Flat Book™

+1.620.345.6394
Bradbury Flat Book™ - Section 2
READ SECTION 1 OF THE FLAT BOOK™ HERE
The 3-Stage Leveling Process
Up to now, we have covered the reasons a coil has different shapes and the properties we have to work with. Now let's detail the internal process that actually occurs when leveling a metal strip.
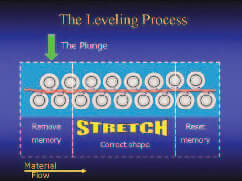
Leveling is achieved by precisely bending a metal strip back and forth as it passes through a series of small diameter offset rolls. The gap between the rolls is set independently on the entry and exit of hydraulic levelers. To level a metal strip, we deeply nest the entry rolls, forcing the metal to pass through extreme angles to erase "memory" caused by trapped internal stresses. We refer to the entry area as "The Plunge." This is where we yield the material - or remove the memory from the strip.
Stage 1:
The Plunge™: Removing Internal Stresses
It is easier to understand internal stresses if we think of these stresses as layers within the strip.
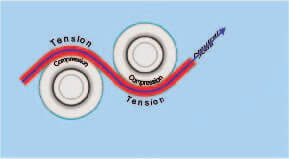
The outer layers of the material maintain the highest stress. If we apply enough tension to the outer layers to reach through the metal's yield point, the layer will stretch and move the memory to a new position. This new position occurs most in the layers farthest from the work roll. The center layer is untouched, so it is called the neutral axis. This neutral axis will retain the original memory. However, if we provide adequate roll wrap, the neutral axis will have little or no effect on the overall cross section of the metal strip. Leveling depends on the reaction of metal as it is bent around the work rolls. Compression stresses occur in the metal closest to a work roll, and tension stresses occur in the metal farthest away from a work roll surface.
Cross-Sectional Stresses
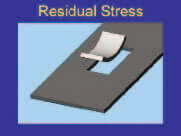
Internal stresses within the strip are caused by trapped tensions aiming in all directions at the same time. If leveling is performed properly, these internal stresses will be aligned in a similar direction and will stop competing against each other. If not , these forces manifest themselves as twist and bow when smaller pieces are separated from the master strip by punching, laser cutting, shearing, or stamping. This makes it complicated to anticipate the reaction of the material during tooling design or weld fixturing, etc.
Often, the coil appears to be flat as it rolls off the uncoiler. Our tendency with a good coil is to just slightly touch it with the leveler and flatten the coil set. Even though sheets might look flat in the stacker, without the proper plunge, we have not aligned the internal stresses. When your customer puts these sheets in a secondary operation, they will twist and bow and may cause scrap or require rework of the end product. The solution is to leave the backups flat and continue to set the entry plunge to the depth prescribed for that thickness and yield.
It is up to the leveler operator to identify the shape problem for every coil and then make the proper adjustments to correct the strip. It is also the duty of the operator to send the strip out as stress free as possible and within the flatness specifications of the customer.
Most leveler manufacturers provide a startup settings chart that helps the operator achieve the proper plunge depth for a given yield strength. These charted settings are calculated based on yield, gauge, roll diameter, center distance, MOE, and strip width.
Stage 2: "The Stretch"
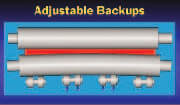
Backups
Movable pressure points under the lower leveler rolls are called backup flights. They are strategically positioned to nest the rolls closer together. Nesting the rolls increases the path length that part of the strip has to travel while other parts move freely through the rolls. Let's take a closer look at this very important concept.
The shortest distance between two points is a straight line. If material is rippled, it is already too long in the rippled area. We don't want to stretch this portion of the strip any farther, so we would leave the backups lowered - allowing the material to pass easily through the rolls. However, the material that looks the best must be stretched. So we would raise the backups under this tighter area. Seeing flat strip at the exit of the leveler is evidence that material lengths are equal.

Short Path

Long Path
If we examine edge wave, we will see that the outer edges are wavy due to longer material lengths. (See illustration on page 5 for edge wave and center buckle.) We don't want to stretch them farther , so we would choose the Short Path for the outer edge flights. In order to achieve flatness, the center portion of the strip must be stretched. We would adjust the central flights upward to nest the rolls deeply, forcing the center of the strip through the Long Path. If the edges and the center of the strip are of equal length, the strip will be flat when it exits the leveling rolls.
If center buckle is present, this means that we have a "long" center. The flights should be adjusted higher on the edges to make a longer path for the edges of the strip. It is human instinct to want to work the material where it looks the worst. But, in fact, we must always work the material where it is flat and tight - because this is where it is shortest and needs stretching.
Stage 3: Reset the Memory
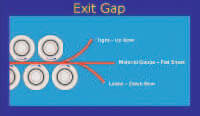
Exit Gap
With the memory removed in the first stage, we must now reset the memory so that the leveler will form a flat panel. This is done by adjusting the exit gap of the leveler to the material thickness. If you set the exit gap too deep, the material will hit the last roll and be formed upward causing Up-Bow to the finished sheet. If the exit gap is set too far open, less pressure will be applied and allow the sheet to curl downward causing Down-Bow.
The last thing the material will remember is the shape of the last roll. It is important that it sees a configuration that is what the customer expects - flat at material thickness.
Talk with the Leveling Experts!
+1.620.345.6394